hops, one of which is Eurasian and three of which are North American, are all the same species (Humulus lupulus). Further complicating matters is the fact that among the single Eurasian hop variety, we have numerous cultivars like Fuggle and Cascade ‐ plant lines selected and bred for differing characteristics.
The Eurasian hop was introduced to North America in the 1600s and was spread by settlers from the East Coast through New England, Canada, the Midwest and eventually California and the Pacific Northwest. In each place, some hops escaped cultivation and grew on their own, or
naturalized, and interbred with native species. Brewers Gold is one cultivar that has Eurasian and North American genetics.
What are hops
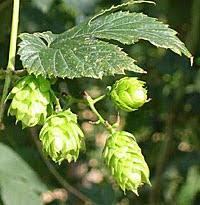
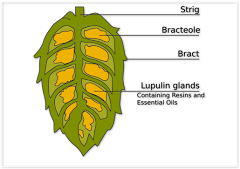
The hop (Humulus lupulus) is a perennial twining plant with annual vines that produce flowers called cones. These cone-shaped flowers contain small lupulin glands, which in turn contain the acids, resins and essential oils we brewers use to impart the bittering, flavoring and aromatic qualities to our beer. Thus, our primary goal as hop growers is to harvest the hop cones, dry them and quickly get them into the freezer to retain peak freshness. Our secondary goal is to enjoy the pleasure of cultivating these plants. Because they grow so fast and tall (about 18 feet), hops provide a lot of visual entertainment and shade as they proceed through the fast vegetative growth, lateral growth and blossoming stages to the much-awaited cone ripening and harvesting.
Anatomy
The crown is the perennial part of the plant that grows under the soil. Each spring, warming soil temperatures cause the annual vines to shoot out of the crown, burst through the soil and race skyward. The helical structure of these shoots causes their tips to grow in a clockwise twining action, so they are called bines instead of vines. The grower must provide a structure for the bines to twine upon.
Growth Cycle
Underground shoots, or rhizomes, grow laterally from the plant and may emerge from the ground as basal growth. These rhizomes or slips are genetic clones of the parent plant. Other parts of the crown include fibrous feeder roots and fleshy storage and water roots. The vegetative growth of the primary bines will normally reach heights of 15 to 20 feet. Branches or laterals will extend from the main bines upon which the cones will grow if conditions are right. Most of the cones will occur on the upper half to two-thirds of the bine.
Hops are tolerant of cold but need at least four months of frost-free days to flower and ripen. Also, hops need relatively long periods of daylight to switch from their vegetative phase to the flowering phase. These requirements limit commercial hop production to the latitudes between 35 and 55 degrees. The minimum daylight needed will vary with hop variety or cultivar, average temperature and altitude. By the summer solstice, the hop plant will have switched into its flowering phase if it's going to. If you are at a latitude where the longest day doesn't give the plant its minimum amount of daylight, the hop won't flower. Soon burrs will appear on the lateral branches of the bines. The quantity of burrs is proportional to amounts of light reaching the laterals - another reason to locate plants where they will receive plenty of sunlight. These burrs turn into green hop cones.
As the plant grows throughout the summer, the cones mature and become ready for picking. One advantage of growing your own hops is that you, like Juan Valdez with his coffee beans, can pick your hops throughout the summer just as they become ripe. This can allow the home grower two or three minicrops during the season. In contrast, the constraints on commercial growers require them to cut down the bines when the average hop cones are ready and feed them into picking machines. With home-grown hops, cones can be harvested and the plant allowed to continue growing, thereby allowing more nutrients to be manufactured in the leaves through photosynthesis and stored in the roots. The home-grown crown thus finishes the season stronger and more able to withstand the winter and get off to a better start the following spring.
In the fall, the hop plant will begin its transition into winter dormancy. The annual bines will die back to the crown, the leaves will fall to the ground and the crown's metabolism will decline along with the cooling fall temperatures. This is the time to prepare the plant for winter by cutting down the bines and covering the crown with a blanket of organic material and mulch.
Hop Yard Planning
First, remember hops will grow 15 to 20 feet, so select an adequate vertical or horizontal space. Hop crowns should not be spaced any closer than two or three feet. Select a site that will receive the most sunlight - usually with southern exposure - and that has some protection against wind. Strong winds can damage or break the bines, especially when the weather is cool and the branches are brittle.
When planning the layout, consider how you will be picking the hops. With the vertical growth method, picking can be done either from a ladder or, with a little ingenuity, the plant can be disconnected from a top wire, picked, then put back in place. Otherwise, the grower can cut the bines at the crown, lower them and pick them in a convenient location.
Go Horizontal!
A layout approach that makes picking easier is the horizontal hop yard. Here the hops are trained up a twine or pole for the first eight or 10 feet, then taken horizontally along another twine or support for eight to 10 more feet. The secondary branches with the hop cones will then hang from the horizontal supports, and picking can be done comfortably while standing on the ground or short stool. The overhead hops can be used as a shade-producing element for a beer garden - a nice place to enjoy the view of the developing hops!
Soil Needs
Hops prefer a deep, loamy, well-drained soil in the pH range of 6 to 7.5. Salty soil or soil with poor drainage is undesirable. Add sand to the soil to improve drainage and try deep irrigation to reduce saltiness. The pH can be adjusted with lime to reduce acidity or sulfur to reduce alkalinity. Try to make pH adjustments in the fall, because the lime will interfere with nutrient uptake for about a month after its addition. The soil should contain 20 to 30 percent organic matter such as compost or dehydrated cow manure. Organic material plays an important role in making the soil nutrients available to the roots.
Nutrients
Hops have a very big appetite and need lots of nutrients. Fortunately, those nutrients required most - carbon, hydrogen and oxygen - are freely available through the air. The next most important nutrients - nitrogen, phosphorus and potassium, generally referred to on most commercial fertilizer sacks as "N-P-K" - are usually deficient in the soil. I use an organic 8-8-8 fertilizer applied at the rate of five pounds per 100 square feet (about one handful per plant) once in the early spring and again about six weeks later.
Watering
Hops are very thirsty plants, but their roots will rot if allowed to stand in water. This is why well-drained soil is so important. During their initial growth, frequent light waterings will be sufficient. Once the plant is established, deep, relatively infrequent waterings will encourage a strong, deep root structure and high drought tolerance. I don't recommend sprinkler systems because they tend to encourage mildew formation. A drip-irrigation system controlled by one spigot that delivers water right to the crown of each plant is a better option.
Planting
Hops are cold tolerant and can be planted in the spring as early as the ground can be worked. Hops normally are propagated from rhizomes that are available from March to May, thus planting is usually done during this time. However, you can plant rhizomes later in the season and even in the fall if you can find them. The first year's growth likely will not yield any cones and is devoted primarily to establishing the crown and root system. The rhizomes should be kept cool and moist until you are ready to plant them. Plant two to a hill or site with the buds pointing up. Orient them at a 45-degree angle with the upper end an inch or two below the soil line. The upper node will then become the annual climbing bine and the lower node will develop into the root system. Cover the rhizomes with fine loamy soil, then add a layer of mulch to retain moisture and keep the weeds down. Place a stake about six inches from the crown to mark its location and provide an anchor for the twine.
Stringing
Once the shoots have grown a foot or two, select two or three of the strongest ones to train around twine. I like to use thick plastic twine rather than paper or jute, because the plastic is less susceptible to rotting caused by sun and moisture. Make sure the twine is coarse because the bines' climbing hairs need something to cling to. Don't disturb the shoots on a cool or cloudy day, because they are brittle then and may snap when you try to train them. Fortunately, the next node down will produce another growing tip. Trim off the smaller stem and the remaining stem will develop into a new growing tip. Rather than suffer through all this trauma, you should wait to train your hops until a warm, sunny day. On that fine day, particularly in the afternoon, your hop shoots will be pliable and the risk of snapping them will be diminished.
Trimming and Tending
Trim back the untrained shoots to ground level. Alternatively, you could trim them back to a foot or so, lay them over onto the ground and cover with soil and mulch. These will become additional rhizomes you can use later to increase your hop yard plantings. As the season progresses, continue training your hops, trimming new growth and mulching to keep the weeds down. After the hop burrs have appeared, it's a good idea to remove the lower three or four feet of foliage. This helps prevent fungus and other diseases from developing by removing their easiest pathway upward from the base of the plant, and improving air circulation.
Pests and Pestilence
The best defence against attack by pests and diseases is to grow the healthiest, hardiest hops possible. Selection of disease-resistant cultivars is the first step. Next, select a sunny site with good drainage. Provide adequate spacing and support for good air circulation; proper pH, soil composition and fertilization; adequate and appropriate watering; and proper training and pruning to prevent shading and overcrowding. Despite our best efforts, hops may be attacked by diseases and pests. The diseases generally fall into two classes: mildews and wilts caused by fungi that can kill a plant quickly, and viruses that slowly take their toll through reduced plant vigor and yield. Pests generally include aphids and mites.
Downy mildew is the most common disease. Avoid the hot, moist conditions that favor spore germination. This is why it is better not to use sprinklers to water the plants. If you must sprinkle, do so in the morning so the leaves and shoots can dry.
Powdery mildew is another fungus. Systemic or spray fungicides for downy mildew and sulfur-based fungicides for powdery mildew can be used as a last resort. Follow the directions carefully and wait the prescribed length of time between application and harvest.
Verticillium wilt is a soil-borne fungal infection which may affect the plant differently over the years. There is no known control for verticillium wilt. Infected parts of the plant should be removed, and if the wilt persists over the years, remove the plants and start new plants elsewhere. Viral infections have no known cure and the best way to avoid them is to promote plant health and vigor.
The most common insect pest is the hop aphid. It is a tiny, soft green pest that sucks the juices out of the plant. Aphids tend to multiply when the weather is cool. They should be controlled before the hops produce cones, because once they get into the cones a black mold grows on their secretions rendering the cones unusable. Ladybugs (ladybird beetles) are a natural enemy of aphids and will help keep them under control. Plant flowers that attract ladybugs, such as Golden Marguerite. Insecticidal soaps and diatomaceous earth have been used successfully to control aphids. As a last resort, commercial insecticides can be used.
The next most common insect pest is the spider mite. They are found in hot, dry climates and also like to suck the juices out of the leaves and petals of the hops. Insecticidal soap solutions have proven to be effective at controlling these pests.
Harvesting
Monitor your hop cones for signs of ripeness. Give them a light squeeze occasionally and when they feel light and dry, and spring back after a squeeze, they're ready to pick. If the cones seem soft, damp and remain compressed after a squeeze, they're not yet ready. When ripe the lupulin glands at the base of the cone petals will be apparent with a golden yellow color and a fragrant, sticky residue when squeezed.
A little preparation will help your hop harvest go smoothly. First, wait for that fine day when the hop vines are pliable and the cones are dry. If you are letting your plants continue to grow after picking, don't risk breaking the vines by picking on a cool or wet day. Wear a long-sleeved shirt to protect your arms from the coarse climbing hairs of the bines. If you are cutting them down to pick, cut the lower bines first at about three feet above the crown. This will prevent damage to the crown and roots caused by tugging and preserve the lower bines for propagation. Then cut the upper bine from the top wire and lower it into position for easy picking.
Be careful with your hops to avoid getting them dirty or damaging the precious lupulin glands. If you are picking from a ladder, keep both hands free by attaching your hop sack to yourself or the ladder. A mature hop plant should produce one to two pounds of dried hops.
Drying
Once you've picked the hops, it's important to dry them right away to prevent mold or mildew from spoiling them. If you have warm, dry weather, the simplest method is to spread the hops out thinly over screens borrowed from your windows. Turn them at least once a day and they should be dry in a few days. The cones should be kept in an area protected from wind, bugs and bright light because light tends to hasten oxidation and lightens their colour. You could use a food dehydrator or oven to dry the hops, but do not exceed 140 degrees F (60 degrees C). The acid test for dryness consists of bending the cone's inner stem or strig. When it is brittle and snaps, the hops are dry.
Storage
Heat, oxidation and moisture are the enemies of hops, so it is important to store them in a cool, dry, dark place such as a refrigerator or freezer. Place the cones in oxygen-barrier freezer bags, squeeze the air out, seal and place in the freezer. If possible, displace the oxygen in the bag with carbon dioxide before sealing. You can store your hops in glass jars. Don't forget to label and date your stored hops.
Estimating Hop Bitterness
The old standard method to estimate alpha-acid percentage is to make an educated guess and then modify the guess as you gain brewing experience with your hops. Because homegrown hops are fresher and have suffered less handling, they are more bitter than commercial hops. Estimating their alpha as 50 percent higher than the average alpha for the same commercial cultivar is a pretty good guess. Knowing the exact alpha of your hops is less critical if you use them only for flavor and aroma additions.
We can improve on this guess with a taste-testing technique I call "ratiometric titration." The approach here is to compare a same-cultivar hop of known alpha content with our unknown alpha hop. We compare the ratio of quantities of sugar needed to overcome the bitterness and infer that this ratio will equal the ratio of alphas. Thus, if it takes five teaspoons of sugar to offset the bitterness of our homegrown hops and three teaspoons to null the commercial hops, then our hops are five-thirds as strong, and our alpha-acid content is five-thirds the commercial alpha. If the commercial alpha is 6 percent, then our alpha is 5/3 times 6, or 10 percent.
I make up two hop tea samples - one from our unknown alpha fresh hops, and the second from commercial whole leaf hops of the same cultivar with known alpha. Stir one-quarter ounce hops plus one teaspoon sugar into two cups of boiling water (the sugar is needed because the hop resins are nearly insoluble in plain water.) Next, reduce the heat and simmer with the lid on for 30 minutes. Now add enough boiled water to each sample to bring their volumes back to two cups. Let the teas settle and cool to room temperature. Next, decant and filter the teas through a coffee filter to remove sediment.
Now comes the tasting part. It's best to do the tasting in the morning when your taste buds are freshest. Measure a quarter cup of each of the hops teas. Now taste a few drops of the unknown alpha tea and rinse off your tongue. The tea will taste bitter, of course. Next, add one-quarter teaspoon sugar and taste. It will taste a little less bitter. Continue titrating the tea with the sugar in quarter-teaspoon increments (and doing a tongue rinsing between each tasting) while tasting for the point when the predominantly bitter taste finally gives way to a sweet taste (with bitter overtones). This is when the bitter loses its bite. Record the amount of sugar it took to reach this turning point. Now repeat the titration with the known alpha tea. The ratio of the titrated sugar for the unknown hops to the sugar required for the known hops is our estimate of the ratio of the alphas of the respective hops.